Friday, August 12, 2011

Label Makers are for Wusses

That's a lie.  I wish I owned a label maker, I sometimes dream about them.  I wish I was kidding.  They are just too expensive.  I could never justify spending that much money (granted, I know they make cheap ones but I dream about the kind of label maker that has different fonts and sizes and colors... ahh a girl can dream, can't she?!) on an organizational device .
The reason I bring this up is that I am currently in packing/moving mode.  I decided, now, would be a great time to get all our odds and ends organized, contained and labeled.  So, I gathered up my "poor lady's label maker" and headed out to the garage to get to work.


Now, I know what you're thinking, "that just looks like a dumb pack of stickers and some Mod Podge" and you would be correct.  However, when combined, these two fancy little elements make one helluva label making machine.  I found this pack of stickers at some craft store close-out, way back in the day (but any sticker, of your choosing, would work just as well) and I have been using the glory that is Mod Podge ever since I started crafting (which can be found at Michael's for under $5).  So, it only seemed natural that they combine  forces.  To give you an idea on what went down..


Although a little excessive, I do believe it will allow us to move everything from the garage over to the new place easily and help to keep everything organized, even after the move.


I was super excited when I was all done, however, it was a little overwhelming to see just how many tubs I have that contain decorations, craft supplies and costumes.  Yikes.


I may have gone a little overboard.. ahh well.  
Once I start labeling, I just can't stop. 

Wednesday, August 10, 2011

Mummy Bottles

It is NEVER too early to plan for Halloween!!  Granted, this is coming from a girl who has an entire shelving unit in her garage comprised of tubs containing Halloween decorations.  But still, it is never to early to get ready for the most spooktacular holiday, ever.  This little project happened to be a bit of a challenge because I tried a couple different ideas (that clearly didn't turn out) before I came up with this one.

My first idea was a take on this gem, which I found while I was perusing Pinterest.  I wanted to paint the bottle black and decorate it with spider webs, so I could make a spooky flower vase.  However,  the idea of the crafting challenge was to only use items that I had lying around the house and clearly, after several attempts of trying, I realized I did not have the right kind of paint.  I will revisit this idea though and let you know how it worked with puffy paint and spray paint.

So, in order to cover up the bad paint job on the bottle (trust me this looks a lot worse in person than in the picture) I decided to turn my spider vase into a mummy vase.  

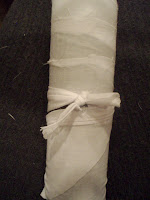
I started off by using an old piece of scrap fabric to make the mummy wrap.  I cut slits into the fabric, each about an inch apart and then ripped the fabric to make the strips.

After, I pulled the loose strings on each strip to give the edges a nice fray.
This part can get a little tedious but it is definitely worth it because the strips look really cute when you're done.


Next step was to knot all of the ends together, this way I had one long piece of fabric to work with rather than a bunch of smaller pieces.
I kept the knots as small as I could because I knew there would be several on the bottle and didn't want it to be overwhelming.

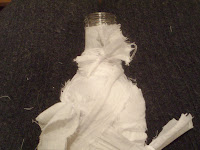
Time to start the mummification process.  Since the fabric is slightly transparent, my first layer was designed to cover the whole bottle,
then I just wrapped the following layers around the bottle in a rather haphazard manner.

I finished by tying the loose end to one of the preexisting knots and bingo-bango, I had a mummy on my hands.


The cherry on top, if you will, was to give this little sucker some eyes. I used some construction paper to cut out the eyes and attached them with the sticky photo squares.  


I decided to make my mummy a family, because he/she seemed so lonely, so I wrapped up my two mini bottles of Sutter Home wine (don't even ask why I have those in my liquor cabinet.  Apparently, I feel like I am going to experience a wine crisis and will need to open up the mini bottle to hold me over until I can get my hands on a real bottle) and added them to the mix.

I can't decide whether I should turn the larger bottle (aka former vodka bottle) into a vase or refill it with booze/mixer for the Haunted Bar (this is the bar that will replace the current liquor cabinet in my home, come Oct 1 of course).  Ah, such a big decision!  Thankfully, I  have some time to figure that out.  One thing I do know is that I am definitely going to decorate a bottle of wine/six pack of beer/bottle of booze like this for Halloween.  It would make a Boo-tastic (Sorry, I couldn't resist :) gift for someone.  

Saturday, August 6, 2011

Hula Wine Kozie

My craft wall does tend to get mocked on a regular basis but I like to think that it provides me with the necessities needed to do something festive on the quick.  I always keep a drawer full of Raffia available for when I need to swiftly decorate a present or upgrade a blah old' bottle of wine to a gift.  It is the most amazing stuff in the world.  Let me give you the rundown. You can pick it up at any Michael's and comes in a variety of ways.  I usually go with bagged stuff (seen on the left) but it also come on a roll and in different colors.  Cost wise, it can run anywhere between $2.50 and $5.00, depending on which kind you get.  I love this stuff because nine times out of ten, we are swinging by the liquor store on the way to someone's house to pick up a bottle of booze/wine and I will grab some raffia as we run out the door so I can put the gift tag on in the car.  I think it jazzes up a package and makes it look like you spent time decorating something, even when you haven't.  
Sorry friends!! :(  

I wanted to use the raffia in a different way and decided to take the bundle I had on my craft wall and create my own ball of yarn out of it.  That way, I could crochet myself a square piece that could be used as a decorative wine kozie.  To start, I just tied the ends together and then wrapped them around the nearest object, so it wouldn't get all tangled up.  


Don't panic, I used an old remote so I was still able to TiVo through the commercials of Renovation Nightmares.  Thank you HGTV!  I wasn't concerned about making it look 'clean,' so I left the knots a little longer to give it some character (and cover up any mistakes) in the end.  The look I am going for here is hula grass, so I wanted little bits of raffia coming out every which way.  Once I made a long enough bundle, I attached my crochet hook and got down to work.  


I used a bottle of wine (it was just lying around) to measure out the length of my first piece.  Note: the piece will shrink a little bit as you crotchet further so it's better to have it be a littler longer rather than a little shorter.  


I discovered that the best part of this project was that it didn't have to be perfect.  I definitely skipped some holes and had some sections that were longer than others.  Raffia is pretty unpredictable and has a bunch of random strings that will get in your way or get stuck on the crochet hook.  However, when I was done with the square, I pulled at it till some of the bigger mistakes weren't as noticeable and then pulled out all  the knot ends to cover up some of the other areas.  


I knotted two longer pieces of raffia on opposite ends of the square.  


This allowed me to tie it onto the bottle, just like you would lace up a corset.  The raffia provides a decent amount of give so don't panic if there is a large gap in the back.  You will be able pull the corset strings tight to close it up.     


For the last part, I made some gift tags, which can once again cover up any errors in the kozie, and shockingly, tied them on with some strings of raffia.  


And you are done!  It took me a little longer than an hour long episode of Renovation Nightmares (are you really surprised when chunks of drywall fall on your face because you were THROWING your hammer around the room...

(not so much Renovation Nightmare as Renovation Stupidity) and I think it was well worth it.  Now, I can give a bottle of 2 Buck Chuck as a gift and no one will know until I'm gone :)  Kidding, maybe... 

Thursday, August 4, 2011

Pig Candy and Coffee Can Ice Cream

I decided it would be so much fun to whip up some coffee can ice cream, like I did back when I was 10 and in Girl Scouts.  Although, why they chose to give us a device that sounds like freight trains crashing into cars that are crashing into windows (it is that freakin' loud) makes no sense to me.

I wanted to jazz it up a bit and make it more tasty than blah old vanilla.  So, what to do?  What to do?

I have been intrigued by this "bacon ice cream" phenomenon and wanted to try it out.  So, I figured I would whip up some Pig Candy (oh, what is this you say?  Why, Pig Candy is the only way one can make bacon even more delicious than it already is.  Preposterous?  Absolutely not, you bake brown sugar onto bacon to make it salty, sweet and extra crunchy!  See?!  Bacon just got better!) and mix that in with ice cream.  When I asked my lovely boyfriend for ice cream flavor suggestions, he shouted "Maple Syrup Ice Cream!" and I realized by the look in his eye that I would have to make him some Maple Syrup Ice Cream... with Pig Candy Bacon.  Look at us compromising!!

First, the Pig Candy.  I followed this recipe from Mommy's Kitchen and made sure I loaded on the brown sugar.  Next, onto the ice cream.  You will need:

  • 1 pint Heavy Whipping Cream 
  • 1 pint Light Cream 
  • 2 Tbs Maple Syrup (we used the real stuff because when my man wants syrup, he gets syrup)  
  • Salt 
  • Ice
  • Small Coffee Can 
  • Large Coffee Can 
  • Old T-Shirt
  • Duct Tape 

I know I said that I was going to use things already in the house but I was feeling a bit nostalgic and needed to channel my inner Scout, so I actually ran to the store to pick up some of these items.  This recipe is almost as easy to make as the Pig Candy.  All you have to do is combine both creams and the maple syrup into the small coffee can and seal the top with duct tape.  Place the small coffee can into the large coffee can and fill the gap with ice and salt.  Seal the lid of the large coffee can with duct tape, then wrap the t-shirt around the outside can, once again secure with duct tape (this way you won't freeze your hands off because if you've ever made a martini -not taught in Girl Scouts, weird - you know, ice makes metal COLD).   Then...


It took about 20 minutes of constantly moving the container around before all the liquid transformed itself into delicious ice cream.  After a couple scoops, a garnish of Pig Candy and a sprinkling of the baked bits of brown sugar that was stuck onto the aluminum foil from the bacon (I waste nothing that is stuck to aluminum foil; not cheese, not crispy brown sugar, NOTHING)...


Although I had to run to the store, this whole thing cost me under $15 ($15 because a thing of 'real maple syrup' costs $10... outrageous Canada, outrageous).  Luckily, I save coffee cans because I think I will use them for other projects (or I'm too lazy to pick up the garbage next to the garbage can) so those were free.  I bought 1/4 lb of bacon from the deli counter at our produce place (it's way cheaper that way and I can buy the exact amount I actually need) and it cost $0.98, plus the two creams came out to $3.00.

Soooooooo good!!  I do know that if I was still  in Girl Scouts, this would have gotten me a patch.  I want my patch!

Tuesday, August 2, 2011

The Summer Crafting Challenge... Cookies and Milk

Since it has been way too humid, for what seems like all summer, I can no longer enjoy outdoor activities.  I've been thinking of things that I can do with all my free time and while I absolutely LOVE Bravo, I need to break away from ALL of the Real Housewives (and Jeff Lewis and Matchmaker Patti and Rocco) and be slightly more productive.  Therefore, I have begun The Summer Crafting Challenge.  I wanted to see what I could make/create/redo/ simply using things that I already had lying around the house/garage or what I can find while walking around the 'hood (aka my parents' house/garage - ha, I dare you two to go out of town again).  My goal is to have a new post every other day...  Let the challenge begin :)

To start this little adventure, I figured I would tackle something easy.  Cookies!!  Who doesn't love some delicious cookies and milk?  People who have to turn on an oven on a 90 degree day... but I guess this is a lesson learned.  Anyway, I saw this adorable post on Pinterest and wanted to create my own out of sugar cookies.  I had some frozen dough in my freezer from earlier this summer and figured it would be perfect.  


I chose three adorable shapes:  Shooting Star, Beach Ball and Summer Love (aka: the star, circle and heart cookie cutters that I already own becoming summerized!)  

Scratch that.  Stupid sugar cookies.  There was not one star or heart that didn't break when I tried to remove them from the pan.  I'm not even showing the "after baking" pictures because it is too depressing.  I think they would have turned out really well if I was able to actually keep them in one piece.  On a happier note, my dog loved all of the bits that came flying off as I was trying to fight each cookie with all my might.  

Oh well, on to my other idea.  As I dug through my freezer to find the sugar cookie dough, I came across those pre-cut "take and bake" cookies.  Peanut Butter cookies nonetheless.  Even better!!  I had to get over the thought of preheating the oven again but figured I would bake these little gems first, and then when they were still warm, poke the holes in the middle with the straw.  


BAM!  Once I pulled the cookies out of the oven, I transferred them to a different cookie sheet and used the straw to make the holes.  After a couple wiggles (make the hole a little bigger than the straw because it will shrink up a little as they cool) and a couple twists back and forth, the middle came right out.  The dough stuck in the straw but came out with a little puff on the other end. 


Now, I have a delicious cookie and milk treat that I can carry to bed with my one hand and I can carry my book in the other.  Like I said before, I'm trying really hard to break this Bravo addiction!!  
Related Posts Plugin for WordPress, Blogger...