Showing posts with label Under $15. Show all posts

Friday, August 3, 2012

A Poor Girls Walk in Closet :)


My dream is to one day, have a gorgeous walk in closet.  The kind with a chandelier in the middle and an entire wall that will house all of my super expensive shoes (they will more likely be shoes that were purchased from Payless and Nordstrom Rack... but whatever).  You know, like the kind of closet you'd see on an episode of Real Housewives.  Until that day arrives, I decided to dedicate one corner of my bedroom to my cause and create a space that is totally girly and all mine. Hopefully, this will fill the void that is my need for a giant Beverly Hills closet :)

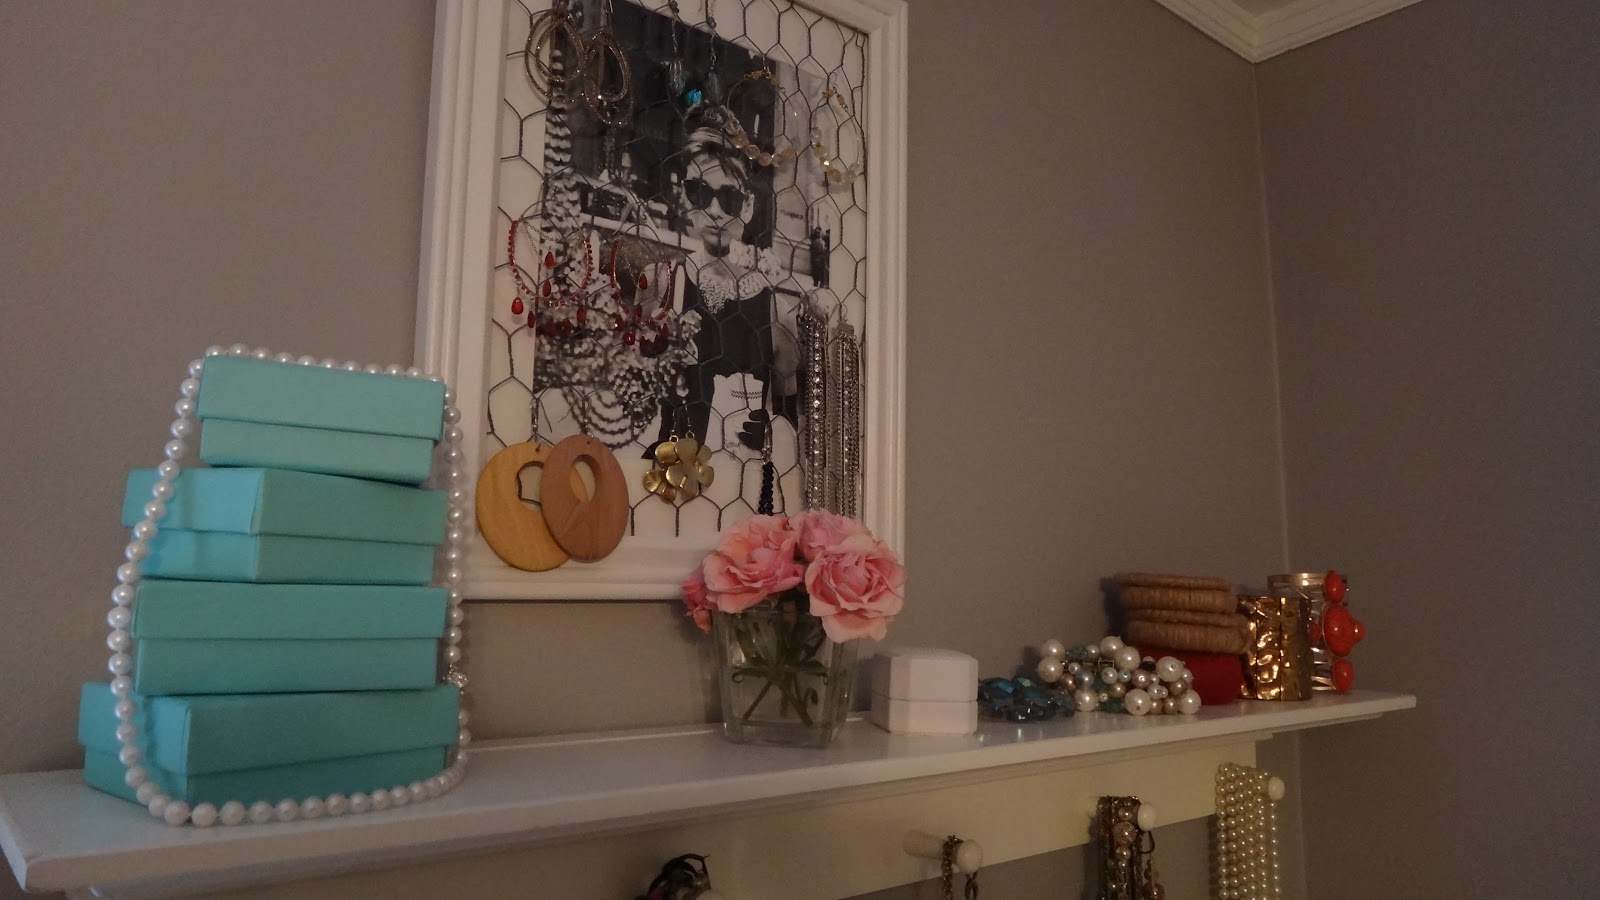
In my dream, I have a section of my closet dedicated to my jewelry.  It's not that I own all these expensive, elegant pieces but I want to feel as if I'm walking into a darling little boutique every time I have to go put something on.  What girl doesn't want that?!  Plus, I am a huge fan of large chunky necklaces and bracelets and well, they are a little difficult to shove into a drawer somewhere.  The biggest challenge for me, was coming up with a way to display all of my earrings.  I am sure I saw this idea on Pinterest or at a flea market somewhere but when I was brainstorming ways to hang them up, this was the first idea that popped into my mind.

To create the earring display, you will need:

* Desired photograph or artwork
* Picture frame
* Chicken wire
* Wire cutters

Flatten out the chicken wire as best you can, you won't get it completely flat but the waves that pop up will help you hang your earrings better.  Remove the glass from the frame and match up one corner of the chicken wire with one corner of the frame.  Make sure that the edges of the chicken wire over lay the lip of the frame and are fully against the side.  Hold the chicken wire in place and then use the wire cutters to trim the other two edges.  Once the wire is cut, put the glass back into the frame, making sure that the chicken wire gets pinned between the side of the frame and the glass.  Add your picture and the backing.  Since the chicken wire is a little thick, I needed the help of the screw driver to push the tabs on back down, making sure they were snug.

Honestly, this is one of the easiest projects that I've ever attempted and I was amazed at how great it looked once I put all of the elements together.  For me this whole thing wound up costing me $0 since I already owned all of these items (just had to repurpose the picture, old frame and white shelf).

I did need to break out the major tools (yes, my hammer does have a bottle opener on the end.  You would be AMAZED at the amount of times that came in handy :) in order to get this little beauty up on the wall. but all in all, it wasn't that hard to do.  I then hung up the white shelf and blam-o  I have my very own jewelry display.

While I don't think any of the Real Housewives of Beverly Hills will be calling me for decorating tips anytime soon, I absolutely love my little corner of heaven.  Whenever I'm getting ready to go out, all I have to do is reach over and pull something off my shelf or grab the earrings off the frame.  I always know what I have and I never have to untangle a thing (which I LOVE!).

Thursday, June 28, 2012

Grilled Ballpark Nachos

My apologies for the delay!! Time is flying by a little too fast and since I have been so consumed with using my new grill and hillbilly sunbathing out in the backyard, I haven't had a chance to share what I've been up to.  


All I have to say is that The Weber truly is the most beautiful thing we own.  Sorry leather Macy's couch and Kohler shower head,  no offense.... but that amazing piece of grilling glory let's me cook everything outside.  I can't even convey how great it is to not have to turn on my oven (woohoo... it's been about 3 weeks now) because it has this magical way of turning my entire kitchen into the Amazon.  Oh, not in a fun, exotic way but in the I-didn't-think-I-could-sweat-this-much-while-standing-still, I-think-I-need-to-take-a-shower-before-eating, kinda way.  So, let phase one of the outdoor grilling recap begin... 

Since Trader Joe's only sells certain items in bulk (I only wanted 2 jalapenos but managed to walk away with 10), I needed to come up with something to do with all of the leftovers and grilled jalapenos seemed like the BEST option.  After washing, de-seeding and slicing the penos in half, I threw them on the top rack of the grill for a couple minutes each side.  


After pulling them off and allowing them to cool a little, I filled the inside with some Merkts Cheese (please don't judge me because I put spreadable cheese on everything).  The only trouble with this process is that putting the cheese in the jalapeno is similar to putting peanut butter in celery.  Slippery little suckers.  So, make sure you scrape the knife sideways, otherwise, it will just keep gliding out.  Once the penos are stuffed, I top them off with some tortillas chips (one full chip will do but I've also used the crunched up bits in the bottom of the bag).  The chips not only function as a handle but they make these grilled jalapenos taste just like the ballpark nachos that we love so much.


And while I cherish processed nacho cheese (really, I do), I am far more excited about using Merkts because it comes from the refrigerated side of the store, which just seems way more natural.  Right?!  Cheese should be refrigerated?!  Don't get me started, I just can't wrap my head around those Velveeta types.  Oh, I eat it and I love it, I just don't understand it!  Anyway... add a little Miller Lite and you would think you were literally at the ballpark... minus the losing or the ridiculously expensive beers.    

Wednesday, April 4, 2012

Pancake Muffins: Breakfast To-Go

I love pancakes! I mean honestly, who doesn't love a stack of fluffy deliciousness, topped with some creamy butter, covered in maple syrup with a cup of coffee on a Saturday morning? Oh, man, yum! If you don't, well then... I... I have no words. The only problem I have with pancakes is that they can be mildly time consuming to make, particularly when I'm only functioning at 1/4 my normal rate (let's just say it takes me awhile to wake up in the morning) and especially when I have house guests and need to provide an abundance of sustenance to six hungover individuals. One could be at the skillet for hours (more like 15 minutes, I know, but it FEELS like hours). Ugh, so daunting. It was while contemplating this little quandary that Pancake Muffins were born!!
I decided to make both blueberry pancakes and an updated version of "pigs in a blanket." So, I started off by browning some Jimmy Deans breakfast sausage in a skillet until it was golden brown. Then, I used some instant pancake mix (just some good ol' Bisquick) and whipped up a batch of batter (say that ten times fast... a batch of Bisquick batter... anyway), according to the directions on the box. I sprayed the muffin tin with Pam (I find it far less messy when I do this outside) and then divided the pancake mix accordingly.


I divided the sausage and blueberries, evenly, into the various compartments.


Then, using a spoon, I pushed the toppings towards the center until they were covered by the batter and popped the whole tin into the oven (preheated to 350 degrees) for 15 mins. I checked on them regularly, using the toothpick method to verify when they were done. After a couple minutes of cooling, I popped them out of the tin, cut them open and slobbered them with maple syrup. The consensus among the formerly intoxicated was unanimous... MMMMMMM.


I had some leftover muffins and realized that they would make perfect to-go breakfasts during the week. However, since they were thicker than normal pancakes, they were a little too dry to eat on their own. So, I channelled the geniuses at McDonald's and using a meat injector, injected the muffins with some maple syrup a la the McGriddle. No mess, no fuss, pure delight!

Thursday, September 22, 2011

Some Easy Fall Fun


The fact that I have recently been MIA is not due to my crafting laziness.  I promise!!!  Nor, is it the fact that I've gotten take out almost every day for the past 3 weeks.  Well, I have, but the reason is far greater than my unwillingness to get near a stove.  My current home remodel has taken up ALL of my time (that, and this little thing called work) so I have not been able to do/blog ANYTHING.  I have, however, been daydreaming of things I want to do once I've set fire to all of my paint brushes and am finally moved in and settled to the new place.  So here they are, some fun things I want to do this Fall, in no particular order...  
  1. Make my own Ravioli from scratch and learn how to make homemade Pierogies (this will require some assistance from my delightful, little, Polish friend Michelle :)...  I know this isn't a typical "Fall" activity but I can finally turn my stove/oven on without turning my house into a sweat lodge, so I say it counts.    
  2. Knit a new winter scarf.  I've been learning to knit and feel like it's time to up my game.  My dog has enough blankets.    
  3. Enjoy some hot Apple Cider Donuts while sitting in my yard (weather must cooperate, not too cold, not too warm.. looking for the perfect brisk day... let's make it happen Skilling).
  4. Have a Ghost Adventures viewing party since the new season is kicking off on Friday, September 23.  Nothing gets me in the Halloween mood quite like Zack Bagans and his amazing hair gel and graphic tees.  If you've never seen the show before, then I urge you to tune in to check it out (with an open mind, of course).  I promise you wont be disappointed (fyi: you might find yourself making side comments throughout the whole episode, ala Mystery Science Theater, but that's where half the fun lies).  
  5. Get a side job so I can purchase this ultimate Fall sweater.  I love me some "sweater weather" and this one just looks so incredibly cozy.  But, I can be practical and order this comfy cableknit which is more in my price range.  
  6. Drink some Hofbrau Oktoberfest from the one liter stein that I carted back from Munich after college.  Due to its extreme weight and the lengthy distance I carried it, it has been decided that this mug really needs to see more action.  
  7. Finally, finally, finally make my dog a Halloween costume.  I have no idea what he will be yet, but this year, I am making sure it happens. 
I feel like 7 is a random number to end on but I ran out of ideas... if I come up with anymore good ones (during a fit of spacing out at work) I will make sure to add them to the list!  Ohh man, I am so ready for the Fall. 

Friday, August 12, 2011

Label Makers are for Wusses

That's a lie.  I wish I owned a label maker, I sometimes dream about them.  I wish I was kidding.  They are just too expensive.  I could never justify spending that much money (granted, I know they make cheap ones but I dream about the kind of label maker that has different fonts and sizes and colors... ahh a girl can dream, can't she?!) on an organizational device .
The reason I bring this up is that I am currently in packing/moving mode.  I decided, now, would be a great time to get all our odds and ends organized, contained and labeled.  So, I gathered up my "poor lady's label maker" and headed out to the garage to get to work.


Now, I know what you're thinking, "that just looks like a dumb pack of stickers and some Mod Podge" and you would be correct.  However, when combined, these two fancy little elements make one helluva label making machine.  I found this pack of stickers at some craft store close-out, way back in the day (but any sticker, of your choosing, would work just as well) and I have been using the glory that is Mod Podge ever since I started crafting (which can be found at Michael's for under $5).  So, it only seemed natural that they combine  forces.  To give you an idea on what went down..


Although a little excessive, I do believe it will allow us to move everything from the garage over to the new place easily and help to keep everything organized, even after the move.


I was super excited when I was all done, however, it was a little overwhelming to see just how many tubs I have that contain decorations, craft supplies and costumes.  Yikes.


I may have gone a little overboard.. ahh well.  
Once I start labeling, I just can't stop. 

Wednesday, August 10, 2011

Mummy Bottles

It is NEVER too early to plan for Halloween!!  Granted, this is coming from a girl who has an entire shelving unit in her garage comprised of tubs containing Halloween decorations.  But still, it is never to early to get ready for the most spooktacular holiday, ever.  This little project happened to be a bit of a challenge because I tried a couple different ideas (that clearly didn't turn out) before I came up with this one.

My first idea was a take on this gem, which I found while I was perusing Pinterest.  I wanted to paint the bottle black and decorate it with spider webs, so I could make a spooky flower vase.  However,  the idea of the crafting challenge was to only use items that I had lying around the house and clearly, after several attempts of trying, I realized I did not have the right kind of paint.  I will revisit this idea though and let you know how it worked with puffy paint and spray paint.

So, in order to cover up the bad paint job on the bottle (trust me this looks a lot worse in person than in the picture) I decided to turn my spider vase into a mummy vase.  

I started off by using an old piece of scrap fabric to make the mummy wrap.  I cut slits into the fabric, each about an inch apart and then ripped the fabric to make the strips.

After, I pulled the loose strings on each strip to give the edges a nice fray.
This part can get a little tedious but it is definitely worth it because the strips look really cute when you're done.


Next step was to knot all of the ends together, this way I had one long piece of fabric to work with rather than a bunch of smaller pieces.
I kept the knots as small as I could because I knew there would be several on the bottle and didn't want it to be overwhelming.

Time to start the mummification process.  Since the fabric is slightly transparent, my first layer was designed to cover the whole bottle,
then I just wrapped the following layers around the bottle in a rather haphazard manner.

I finished by tying the loose end to one of the preexisting knots and bingo-bango, I had a mummy on my hands.


The cherry on top, if you will, was to give this little sucker some eyes. I used some construction paper to cut out the eyes and attached them with the sticky photo squares.  


I decided to make my mummy a family, because he/she seemed so lonely, so I wrapped up my two mini bottles of Sutter Home wine (don't even ask why I have those in my liquor cabinet.  Apparently, I feel like I am going to experience a wine crisis and will need to open up the mini bottle to hold me over until I can get my hands on a real bottle) and added them to the mix.

I can't decide whether I should turn the larger bottle (aka former vodka bottle) into a vase or refill it with booze/mixer for the Haunted Bar (this is the bar that will replace the current liquor cabinet in my home, come Oct 1 of course).  Ah, such a big decision!  Thankfully, I  have some time to figure that out.  One thing I do know is that I am definitely going to decorate a bottle of wine/six pack of beer/bottle of booze like this for Halloween.  It would make a Boo-tastic (Sorry, I couldn't resist :) gift for someone.  

Saturday, August 6, 2011

Hula Wine Kozie

My craft wall does tend to get mocked on a regular basis but I like to think that it provides me with the necessities needed to do something festive on the quick.  I always keep a drawer full of Raffia available for when I need to swiftly decorate a present or upgrade a blah old' bottle of wine to a gift.  It is the most amazing stuff in the world.  Let me give you the rundown. You can pick it up at any Michael's and comes in a variety of ways.  I usually go with bagged stuff (seen on the left) but it also come on a roll and in different colors.  Cost wise, it can run anywhere between $2.50 and $5.00, depending on which kind you get.  I love this stuff because nine times out of ten, we are swinging by the liquor store on the way to someone's house to pick up a bottle of booze/wine and I will grab some raffia as we run out the door so I can put the gift tag on in the car.  I think it jazzes up a package and makes it look like you spent time decorating something, even when you haven't.  
Sorry friends!! :(  

I wanted to use the raffia in a different way and decided to take the bundle I had on my craft wall and create my own ball of yarn out of it.  That way, I could crochet myself a square piece that could be used as a decorative wine kozie.  To start, I just tied the ends together and then wrapped them around the nearest object, so it wouldn't get all tangled up.  


Don't panic, I used an old remote so I was still able to TiVo through the commercials of Renovation Nightmares.  Thank you HGTV!  I wasn't concerned about making it look 'clean,' so I left the knots a little longer to give it some character (and cover up any mistakes) in the end.  The look I am going for here is hula grass, so I wanted little bits of raffia coming out every which way.  Once I made a long enough bundle, I attached my crochet hook and got down to work.  


I used a bottle of wine (it was just lying around) to measure out the length of my first piece.  Note: the piece will shrink a little bit as you crotchet further so it's better to have it be a littler longer rather than a little shorter.  


I discovered that the best part of this project was that it didn't have to be perfect.  I definitely skipped some holes and had some sections that were longer than others.  Raffia is pretty unpredictable and has a bunch of random strings that will get in your way or get stuck on the crochet hook.  However, when I was done with the square, I pulled at it till some of the bigger mistakes weren't as noticeable and then pulled out all  the knot ends to cover up some of the other areas.  


I knotted two longer pieces of raffia on opposite ends of the square.  


This allowed me to tie it onto the bottle, just like you would lace up a corset.  The raffia provides a decent amount of give so don't panic if there is a large gap in the back.  You will be able pull the corset strings tight to close it up.     


For the last part, I made some gift tags, which can once again cover up any errors in the kozie, and shockingly, tied them on with some strings of raffia.  


And you are done!  It took me a little longer than an hour long episode of Renovation Nightmares (are you really surprised when chunks of drywall fall on your face because you were THROWING your hammer around the room...

(not so much Renovation Nightmare as Renovation Stupidity) and I think it was well worth it.  Now, I can give a bottle of 2 Buck Chuck as a gift and no one will know until I'm gone :)  Kidding, maybe... 

Thursday, August 4, 2011

Pig Candy and Coffee Can Ice Cream

I decided it would be so much fun to whip up some coffee can ice cream, like I did back when I was 10 and in Girl Scouts.  Although, why they chose to give us a device that sounds like freight trains crashing into cars that are crashing into windows (it is that freakin' loud) makes no sense to me.

I wanted to jazz it up a bit and make it more tasty than blah old vanilla.  So, what to do?  What to do?

I have been intrigued by this "bacon ice cream" phenomenon and wanted to try it out.  So, I figured I would whip up some Pig Candy (oh, what is this you say?  Why, Pig Candy is the only way one can make bacon even more delicious than it already is.  Preposterous?  Absolutely not, you bake brown sugar onto bacon to make it salty, sweet and extra crunchy!  See?!  Bacon just got better!) and mix that in with ice cream.  When I asked my lovely boyfriend for ice cream flavor suggestions, he shouted "Maple Syrup Ice Cream!" and I realized by the look in his eye that I would have to make him some Maple Syrup Ice Cream... with Pig Candy Bacon.  Look at us compromising!!

First, the Pig Candy.  I followed this recipe from Mommy's Kitchen and made sure I loaded on the brown sugar.  Next, onto the ice cream.  You will need:

  • 1 pint Heavy Whipping Cream 
  • 1 pint Light Cream 
  • 2 Tbs Maple Syrup (we used the real stuff because when my man wants syrup, he gets syrup)  
  • Salt 
  • Ice
  • Small Coffee Can 
  • Large Coffee Can 
  • Old T-Shirt
  • Duct Tape 

I know I said that I was going to use things already in the house but I was feeling a bit nostalgic and needed to channel my inner Scout, so I actually ran to the store to pick up some of these items.  This recipe is almost as easy to make as the Pig Candy.  All you have to do is combine both creams and the maple syrup into the small coffee can and seal the top with duct tape.  Place the small coffee can into the large coffee can and fill the gap with ice and salt.  Seal the lid of the large coffee can with duct tape, then wrap the t-shirt around the outside can, once again secure with duct tape (this way you won't freeze your hands off because if you've ever made a martini -not taught in Girl Scouts, weird - you know, ice makes metal COLD).   Then...


It took about 20 minutes of constantly moving the container around before all the liquid transformed itself into delicious ice cream.  After a couple scoops, a garnish of Pig Candy and a sprinkling of the baked bits of brown sugar that was stuck onto the aluminum foil from the bacon (I waste nothing that is stuck to aluminum foil; not cheese, not crispy brown sugar, NOTHING)...


Although I had to run to the store, this whole thing cost me under $15 ($15 because a thing of 'real maple syrup' costs $10... outrageous Canada, outrageous).  Luckily, I save coffee cans because I think I will use them for other projects (or I'm too lazy to pick up the garbage next to the garbage can) so those were free.  I bought 1/4 lb of bacon from the deli counter at our produce place (it's way cheaper that way and I can buy the exact amount I actually need) and it cost $0.98, plus the two creams came out to $3.00.

Soooooooo good!!  I do know that if I was still  in Girl Scouts, this would have gotten me a patch.  I want my patch!

Tuesday, August 2, 2011

The Summer Crafting Challenge... Cookies and Milk

Since it has been way too humid, for what seems like all summer, I can no longer enjoy outdoor activities.  I've been thinking of things that I can do with all my free time and while I absolutely LOVE Bravo, I need to break away from ALL of the Real Housewives (and Jeff Lewis and Matchmaker Patti and Rocco) and be slightly more productive.  Therefore, I have begun The Summer Crafting Challenge.  I wanted to see what I could make/create/redo/ simply using things that I already had lying around the house/garage or what I can find while walking around the 'hood (aka my parents' house/garage - ha, I dare you two to go out of town again).  My goal is to have a new post every other day...  Let the challenge begin :)

To start this little adventure, I figured I would tackle something easy.  Cookies!!  Who doesn't love some delicious cookies and milk?  People who have to turn on an oven on a 90 degree day... but I guess this is a lesson learned.  Anyway, I saw this adorable post on Pinterest and wanted to create my own out of sugar cookies.  I had some frozen dough in my freezer from earlier this summer and figured it would be perfect.  


I chose three adorable shapes:  Shooting Star, Beach Ball and Summer Love (aka: the star, circle and heart cookie cutters that I already own becoming summerized!)  

Scratch that.  Stupid sugar cookies.  There was not one star or heart that didn't break when I tried to remove them from the pan.  I'm not even showing the "after baking" pictures because it is too depressing.  I think they would have turned out really well if I was able to actually keep them in one piece.  On a happier note, my dog loved all of the bits that came flying off as I was trying to fight each cookie with all my might.  

Oh well, on to my other idea.  As I dug through my freezer to find the sugar cookie dough, I came across those pre-cut "take and bake" cookies.  Peanut Butter cookies nonetheless.  Even better!!  I had to get over the thought of preheating the oven again but figured I would bake these little gems first, and then when they were still warm, poke the holes in the middle with the straw.  


BAM!  Once I pulled the cookies out of the oven, I transferred them to a different cookie sheet and used the straw to make the holes.  After a couple wiggles (make the hole a little bigger than the straw because it will shrink up a little as they cool) and a couple twists back and forth, the middle came right out.  The dough stuck in the straw but came out with a little puff on the other end. 


Now, I have a delicious cookie and milk treat that I can carry to bed with my one hand and I can carry my book in the other.  Like I said before, I'm trying really hard to break this Bravo addiction!!  

Thursday, May 26, 2011

Holy Chip

Dear Jiminy Chips,

While I appreciate the deliciousness of your amazingly thin and funky flavored chips, I refuse to pay the exorbitant amount you charge for what is ultimately 19 slices of potato.  The size of the bag is highly deceiving and I was truly tricked when I discovered it to be only a 1/4 filled.  I mean, come on, $4.99?  For a bag that isn't going to survive the trip home from the store?  Are you outta your damn minds?

I am outraged!  I am discouraged and now I am hungry!  I implore you to rectify this situation before I lose both my mind and all the $$ in my pocketbook. 

Thank you for your time,
Sarah 

---------------------------------------------


It is my anger towards "Big Potato" that has driven me to a manic state of homemade 'tato chip creation.  That, or I really wanted to deep fry something anything and was looking for a more convincing reason than its... Thursday.  Either way, I won because look at the potato chip bounty that resulted. 

This whole process was extremely easy to do (mainly because I had a very handy gentleman offer to dig the deep fryer out of the garage for me and slice most of the potatoes) and was significantly cheaper then store bought chips. 

WARNING:  All the chips that you are about to see cost a total of $1.56. 

I followed this easy recipe but would like to add some additional notes and findings.  
  • Our potatoes were soaked in both water and vinegar. 
  • While the larger slices were preferred with the Idaho potato (hereafter known as 'the regular potatoes'), the smaller slices were preferred with the sweet potato. 
  • We discovered that the dryer the chips are, the better. They crisped up nice and didn't stick together. We left them laying out, ucovered all night and that seemed to do the trick.
You can slice the potatoes by hand if you’ve got some time to kill but I would recommend getting one of these little ditties.  


(Don’t be alarmed at the prices in the link... we found this one at the Korean grocery store by our house for $20 and it works great. Those should just give you an idea.) It saves so much time and all of the slices come out in perfect little ovals!!

Once I pull the deep fryer out and load it up with the oil, I deep fry until my little heart is content because I don’t want to clean it up. So, if I figure, if I keep deep frying things, I’ll never have to actually wash anything. This resulted in me having potato chips for dinner one night (ahh I love being an adult – take that mom!) and coming up with some deliciously flavored chips and awesome dips. My chip guinea pig (aka: the idea man) sampled all the flavors/dip and ranked them in order of preference below.


Have you ever eaten a potato chip that made you forget you even had other food on your plate, because they were too delicious to stop eating? No? Well whip up these sweet and sour delights and you will have that very experience. Who needs a sandwich and pickle when you have chips like these staring right at you!


Wisconsin has given us things we love (Germans, cheese, beer) and things we hate (a stupid football team that wears a dumb green color, Brett Favre, angry teachers). Let me tell you though, when you put the best Wisconsin exports on a chip, you are teleported to holy cheese head heaven. Makes me forget the Packers even exist.


This creation was perfected by Sullivan’s Steakhouse and when paired with a martini, it will ease any stress-anxiety-bitterness you may have. Guaranteed or your money back. Well, I won’t actually send you money but you get the idea.


If you are dealing with a less than agreeable woman, then serve her one of these chocolate delights. A little sweet, a little salty… she’ll return to her pleasant disposition in no time.


The cleaning of the fryer and straining of the oil was less than ideal but now I have put on a solid 10 pounds due to the chip frenzy and my hands and luxuriously moisturized.

Thursday, May 19, 2011

The Beer Garita Senor


With summer quickly approaching (I use the word ‘quickly’ loosely because it is the middle of May and I wore my down-coat and scarf last weekend, however, this is Chicago and we could be in a hot box
tomorrow), I've spent my afternoons day dreamin' of the perfect cocktail to enjoy outside, in a hammock, on a boat...etc, etc.  While any cocktail will be enjoyable, I've come to the conclusion that the "perfect" summer thirst quencher needs to fulfill a certain criteria.  It needs to be:

1. Deliciously refreshing - One day in the near future it will be 91 degrees outside with 80% humidity.  A gentle breeze will be a faint memory as you try to remember a day when the wind caused the rain to come in sideways.  Oh, and there won’t be a single cloud in the sky.

2. Easy to make - Let's face it, the heat will affect my brain in such a way that the thought of standing around, measuring out liquors I can't pronounce (what is Curacao anyway? no idea) will be too complicated a task. 

3. Reasonably priced - I'll definitely need to make enough to last me a whole three months.   Being on a teacher's schedule, I'm allowed several days throughout the summer where I drink before noon, just because I can.  It’s not alcoholism, it’s celebrating freedom from teenage tyrants.  Don't judge me!!  Anyway...  

My drink of choice this summer is what I am now calling The Beer Garita Senor. 

The recipe is as follows:
·     Premixed Jose Cuervo/Sauza Margarita Mix (around $15 for 1.75ml)
·     Coronitas (7oz Coronas that I found at Binny's - $5.99 a six pack)
·     Ice
·     Salt if desired  

Salt rim (which I didn't do here - sad face) of mini fish bowl (I found these suckers in the candle isle at the dollar store by my house - oh how I heart thee Dollar Tree) and fill with ice. Pour in Margarita Mix (it’s up to your discretion, I'm not here to tell you how much is too much :) but you usually want to aim around a 2:1 ratio of margarita to beer.)  Open Coronita and place it into the fish bowl upside down (flip quickly!) *Sidenotes: Coronita will have to pressurize, so it will empty about half way...just want to make sure there is enough room in the fishbowl - I may have freaked out when I first did this.  Also, the Coronita will literally be sitting in your drink, so I washed off the bottles beforehand.*  And I'm done.  In order to prove that this concoction meets all of the summer time cocktail requirements I: 

1. Drank it - It is probably the most refreshing thing I've ever had in my life… Second to the cups of water I guzzled while attempting to run the Chicago Half Marathon… so on that scale, you can see it’s pretty refreshing.      

2. I may or may not have asked a certain someone to time me while I made them.  It took me exactly 2 mins and 16 second to make three (although, I did not salt the rim).  He was annoyed at having to do this but got over it when I handed him The Beer Garita Senor to make up for it. 

3.  Coronita - $1, Margarita - about $1.50 per serving X 2 servings = $4  Ole!

I'm all about the proof people!! 

Have a happy summer AMIGOS!  If you have the desire to drink one at 11:30 on a Wednesday this July, call me :)      

Monday, May 9, 2011

Happy Mother's Day...in a Jar


I saw this idea a couple of months ago and have been putting my desserts in jars every since.  It is such an ingenious idea because not only do the mason jars make for easy transport (I made mini-pies when we went Smelt Fishing) and clean up (just pop 'em in the dishwasher) but they look so flippin' cute I can hardly stand it.

Since my lovely mother's birthday is the same week as mother's day,  I tend to go a little soft on the "Mother's Day" portion of the week and stick to cheap homemade gifts, you know, the kind mother's absolutely love.  Because even though I'm twenty eight, I will still draw her a picture and claim it is a 'present.'  You're welcome mom!  This year, I decided I would bake her something and since I'm on the "...in a jar" kick, I went with cupcakes.  To begin, I mixed up a batch of box cake mix and divided the batter among the mason jars.  One box filled 5 jars. 


I followed the cooking time suggestions for cupcakes but it took a little longer than it said on the box.  However, I did fill these suckers up pretty high and that resulted in...


Mason jars that overflowith.  Lucky for me and my oven, the batter did not explode everywhere, it merely puffed up.  I would, however, recommend putting them on a tray because watching these things in the oven was a little nerve racking.... it was touch and go there for awhile and I was sweating it out anticipating the burnt cake cleanup...not recommended.  I'm sure if you fill them up a little less then you would easily be able to get six jars made from one box of mix.  In order to create my "frosting grass" for the top, I decided it would be best to simply slice off the cake that extended past the jar so I would have a nice flat surface to work with.

The cupcake tops turned out to be a major blessing in disguise because a delicious cupcake sandwich (two tops connected with frosting in the middle) holds over certain people who become extremely disgruntled when they find out that they can't eat one of the cupcake jars... now!

While these little darlings were in the oven, I prepped my accessories.


I mixed up a batch of green frosting (meaning I put food coloring into a tub of Aldi brand frosting) and altered the stems of the flowers.  I cut the stems off about 1/16 of an inch from the base and stuck a toothpick up the middle.  It worked out perfectly and now there is no gross stem sitting in your cupcake.


After everything was assembled, I made little Mother's Day tags for the front and tied them on with some string.


Volia - Happy Mother's Day.  The best part about this little gift (mom, please stop reading now) is that the whole thing was practically free.  I had everything to make these in my cabinets and the flowers were sitting on my living room table.  However, if you do have to pick some of the items up, it will all be under $5 (Aldi cake mix and frosting comes out to $2...AMAZING and the flowers can be any kind you want). 

Love you MOM!!

I am planning on making more things in mason jars and am looking for an opportunity to make individual pot pies.  We will see how long this little trend will last but I thinking it will be awhile because I absolutely love it.  As long as people keep returning my jars, I'll keep filling them!!  
Related Posts Plugin for WordPress, Blogger...